Showing posts with label Xamarin.Forms. Show all posts

Vertical slider in Xamarin Forms

A slider offers a way to get continuously values from the user within a given range of values. There are various type of sliders seen across different apps and can be roughly categorised into horizontal sliders , vertical sliders and circular slider based on its appearance. It can have continuous or discrete values based on the purpose of the slider within the application.

In most applications we customise the sliders to get the look and feel we desire. Most common customisations include changing the height, colour and orientation of the slider.

Today we will be looking into creating vertical sliders in xamarin forms application.We will also look at how to increase the height of the slider and colour of the slider.


How to create a vertical slider :

In Xamarin forms to create a vertical slider, you just have to rotate the slider by - 90 degrees.


   <Slider Rotation="-90" Minimum="0" Maximum="80" Value="0" AbsoluteLayout.LayoutBounds=".5,.5,500,90" AbsoluteLayout.LayoutFlags="PositionProportional"/>


This works seamlessly in both android as well as iOS platform.


How to increase the height and change the colour of the slider:

To increase the height  of the slider we need to add custom renderers in both the platforms.

Step 1: Create custom slider class in Xamarin forms.


using System;
using Xamarin.Forms;

namespace VerticalSlider
{
    public class CustomSlider:Slider 
    {
        public CustomSlider()
        {
        }
    }
}


Step 2: Create a custom renderer for the slider control on each platform. i.e; iOS and Android


[assembly: ExportRenderer(typeof(CustomSlider), typeof(CustomSliderRenderer))]
namespace VerticalSlider.iOS
{
    public class CustomSliderRenderer:SliderRenderer
    {
        public CustomSliderRenderer()
        {
        }

        protected override void OnElementChanged(ElementChangedEventArgs<Slider> e)
        {
            SetNativeControl(new MySlideriOS());
            base.OnElementChanged(e);
        }

    }

}


Step 3: Create a custom slider class

public class MySlideriOS : UISlider
    {
        public MySlideriOS()
        {
        }
   }

Step 4: Override Track Rect For Bounds method to change the height of the slider.
In this method you could return the desired rect for the bounds of the slider.


   public class MySlideriOS : UISlider
    {
        public MySlideriOS()
        {
            
        }

        public override CGRect TrackRectForBounds(CGRect forBounds)
        {
            CGRect rect = base.TrackRectForBounds(forBounds);
            return new CGRect(rect.X, rect.Y, rect.Width, 20);
        }
}

Step 5: When changing the height of the slider in iOS, the most common issue faced is that it loses its rounded corners when the thumb reaches the extreme ends.

To overcome this issue we need to provide the minimum and maximum track images to the slider.

If in case, you are using a custom image you can provide the images to the slider. Otherwise you could just create an image out of a colour and provide it to the slider.

Here is the method to create image from a colour.


        public UIImage GetImage(CGRect recttoDraw)
        {
            CGRect rect = recttoDraw;

            CALayer layer = new CALayer();
            layer.Frame = recttoDraw;
            layer.CornerRadius = (System.nfloat)( (0.35 * this.Frame.Height));
            layer.BackgroundColor = UIColor.Red.CGColor;
            UIGraphics.BeginImageContext(layer.Frame.Size);
            layer.RenderInContext(UIGraphics.GetCurrentContext());
            UIImage image = UIGraphics.GetImageFromCurrentImageContext();
            UIGraphics.EndImageContext();
            return image;

        }

Step 6: Change the maximum track image in the custom slider constructor


        public MySlideriOS()
        {
            this.MaximumTrackTintColor = UIColor.Gray;

            UIImage img = GetImage(new CGRect(0, 0, 400, 400));

            this.SetMinTrackImage(img.CreateResizableImage(new UIEdgeInsets(13, 15, 15, 14)), UIControlState.Normal);
            this.SetMinTrackImage(img.CreateResizableImage(new UIEdgeInsets(13, 15, 15, 14)), UIControlState.Selected);

        }

Step 7: In the custom renderer's  overridden  On element changed method replace the control with the custom slider.


 protected override void OnElementChanged(ElementChangedEventArgs<Slider> e)
        {
            SetNativeControl(new MySlideriOS());
            base.OnElementChanged(e);
        }

Here is how the custom slider renderer should look at the end


using System;
using CoreAnimation;
using CoreGraphics;
using UIKit;
using VerticalSlider;
using VerticalSlider.iOS;
using Xamarin.Forms;
using Xamarin.Forms.Platform.iOS;

[assembly: ExportRenderer(typeof(CustomSlider), typeof(CustomSliderRenderer))]
namespace VerticalSlider.iOS
{
    public class CustomSliderRenderer:SliderRenderer
    {
        public CustomSliderRenderer()
        {
        }

        protected override void OnElementChanged(ElementChangedEventArgs<Slider> e)
        {
            SetNativeControl(new MySlideriOS());
            base.OnElementChanged(e);
        }

    }

    public class MySlideriOS : UISlider
    {
        public MySlideriOS()
        {
            this.MaximumTrackTintColor = UIColor.Gray;

            UIImage img = GetImage(new CGRect(0, 0, 400, 400));

            this.SetMinTrackImage(img.CreateResizableImage(new UIEdgeInsets(13, 15, 15, 14)), UIControlState.Normal);
            this.SetMinTrackImage(img.CreateResizableImage(new UIEdgeInsets(13, 15, 15, 14)), UIControlState.Selected);

        }

        public override CGRect TrackRectForBounds(CGRect forBounds)
        {
            CGRect rect = base.TrackRectForBounds(forBounds);
            return new CGRect(rect.X, rect.Y, rect.Width, 20);
        }

        public UIImage GetImage(CGRect recttoDraw)
        {
            CGRect rect = recttoDraw;

            CALayer layer = new CALayer();
            layer.Frame = recttoDraw;
            layer.CornerRadius = (System.nfloat)( (0.35 * this.Frame.Height));
            layer.BackgroundColor = UIColor.Red.CGColor;
            UIGraphics.BeginImageContext(layer.Frame.Size);
            layer.RenderInContext(UIGraphics.GetCurrentContext());
            UIImage image = UIGraphics.GetImageFromCurrentImageContext();
            UIGraphics.EndImageContext();
            return image;

        }
    }
}

Also don't forget to use the custom slider control in the xamarin forms axml file


<local:CustomSlider Rotation="-90" Minimum="0" Maximum="80" Value="0" 
        AbsoluteLayout.LayoutBounds=".5,.5,500,90" AbsoluteLayout.LayoutFlags="PositionProportional"/>


Here is how the slider is going to look at the end.


I hope you enjoyed this blog ...You can find the complete source code here

https://github.com/pooja-kamath/VerticalSlider.git

I would been soon posting  a blog on how to change the height of the slider in android. Stay tuned..

Handling keyboard events in xamarin

Forms are the lynchpin of all mobile interactions. It stands in-between the user and what they are looking for. Forms are just a mean to an end, and the user must be able to complete them without any confusion.

The most important UI element which helps us fill a form is the keyboard and it is really important to provide the user with a keyboard which assists them to fill the form without any hassle. To achieve this it's really essential to handle the keyboard events.

The keyboard enter key provides convenience to the user when filling a form.It can either dismiss the keyboard or move the cursor to the next field which needs to be filled .

In this blogs we will be looking at ways to handle keyboard key events in a Xamarin.Forms application. In the sample we have considered the back button action.

For iOS  :

Step 1 : Create a custom entry class and create a delegate to handle the back button press


public class CustomEntry: Entry
{
    public delegate void BackButtonPressEventHandler(object sender, EventArgs e);

    public event BackButtonPressEventHandler OnBackButton;

    public CustomEntry() { }

    public void OnBackButtonPress() 
    {
        if (OnBackButton!= null)
        {
            OnBackButton(null, null);
        }
    }
}

Step 2 :Within the custom renderer namespace , create a custom text field class.

[assembly: ExportRenderer(typeof(CustomEntry), typeof(CustomEntryRenderer))]
namespace Origination.iOS.Renderers
{
    public class CustomTextField: UITextField
    {
    }
}


Step 3: Within the custom text field, create a event and delegate to handle the delete button click.

public class CustomTextField: UITextField
    {
        // A delegate type for hooking up change notifications.
        public delegate void DeleteBackwardKeyEventHandler(object sender, EventArgs e);

        // An event that clients can use to be notified whenever the
        // elements of the list change.
        public event DeleteBackwardKeyEventHandler OnDeleteBackwardKey;


        public void OnDeleteBackwardKeyPressed()
        {
            if (OnDeleteBackwardKey != null)
            {
                OnDeleteBackwardKey(null, null);
            }
        }

        public override void DeleteBackward()
        {
            base.DeleteBackward();
            OnDeleteBackwardKeyPressed();
        }
}

Step 4 :Within the custom renderer name space, Create custom renderer class.

 public class CustomEntryRenderer: EntryRenderer, IUITextFieldDelegate
 {
 }

Step 5:Within the custom renderer's OnElementChanged method create a text field of the custom text field type.
Step 6: Handle the custom text field delete event by passing it to the custom entry back button event handler.
Step 7: Assign the custom text field object to native control.
protected override void OnElementChanged(ElementChangedEventArgs<Entry> e)
            {
                if (Element == null) 
                {
                    return;
                }

                var entry = (CustomEntry)Element;
                var textField = new CustomTextField();

               textField.EditingChanged += OnEditingChanged;
                textField.OnDeleteBackwardKey += (sender, a) =>
                {
                    entry.OnBackButtonPress();
                };

                SetNativeControl(textField);

                base.OnElementChanged(e);
            }

Step 8 : Add the editing changed handler

IElementController ElementController => Element as IElementController;

 void OnEditingChanged(object sender, EventArgs eventArgs)
        {
            ElementController.SetValueFromRenderer(Entry.TextProperty, Control.Text);
        }

For Android:


In the custom renderer you can handle the key press event and look for the Keycode.Back.In android customising the text fields are not required.

((EditText)this.Control).KeyPress += (object sender, View.KeyEventArgs even) => { 
        even.Handled = false; 
       if (even.Event.Action == KeyEventActions.Down && even.KeyCode == Keycode.Back) 
       { 
          //your logic here even.Handled = true;
        } 

How to add tick marks on sliders in Xamarin Forms


Discrete sliders can use evenly spaced tick marks along the slider track, and the thumb will snap to them. Each tick mark should change the setting in increments that are discernible to the user.


However to achieve this in Xamarin Forms, one would have to add custom renderer in iOS and Android platforms, but here is a simple way of achieving it, without needing to add custom renderer. 


Step 1: Add a slider and a stack layout within  a grid.

<Grid Padding="0,0,0,0" WidthRequest="365">
<StackLayout WidthRequest ="364" x:Name="stack" ></StackLayout>
<Slider x:Name="slider" WidthRequest ="364"/>
</Grid> 
Step 2 : Declare constants 


private readonly int SliderMaxValue = 150;
private readonly int SliderMinValue = 0;
private readonly int SliderStepSize = 5;
private readonly int SliderTickWidth = 2;
private readonly int SliderTickHeight = 2;
Step 3 : Set slider Min and Max values

  slider.Maximum = SliderMaxValue;

  slider.Minimum = SliderMinValue;
Step 4:Set Stack view orientation  based on slider orientation.

           If the slider is horizontal add stack orientation horizontal.
           This stack view will contain the tick marks behind the slider.
   stack.Orientation = StackOrientation.Horizontal;
Step 5: Add the method to get the buffer offset based on thumb size and tick width.

private double GetOffsetFor(int index)
        {
            if (index == 0)
                return 0.0;
            else if (GetSeries().Contains(index))
                return 3.5;
            else
                return 2.5;
        }

        private int[] GetSeries()
        {
            int[] series = new int[13];
            int[] buffer = new[] {0, 0, 1, 1, 1, 2, 2, 1, 2, 3, 3, 3, 3};
            for (int i = 0; i <= 12; i++)
            {
                series[i] = 2 * i + buffer[i];
            }

            return series;
        }
Step 6: Add the ticks to the stack view 

public void AddTickMarksForSlider( StackLayout view)
        {
            int ticksDivider = SliderStepSize;
            int ticks = (int)slider.Maximum / ticksDivider;
          
            view.BackgroundColor = Color.Transparent;
         
            // make a UIImageView with tick for each tick in the slider
            for (int i = 0; i <= ticks; i++)
            {

                Label tick = new Label();
                tick.WidthRequest = SliderTickWidth;
                tick.HeightRequest = SliderTickHeight;

                view.Padding = new Thickness(15,0,14,0);

                tick.Margin = new Thickness(GetOffsetFor(i),0,0,0);

                tick.BackgroundColor =Color.Red;

                view.Children.Add(tick);

            }
        }


Step 7 : Make the slider steps discrete.

slider.ValueChanged += (sender, e) =>
            {
                double StepValue = SliderStepSize;

                var newStep = Math.Round(e.NewValue / StepValue);

                slider.Value = newStep * StepValue;
            };
This is how its going to look at the end.


I hope you enjoyed this blog... Please feel free to download the sample project from here

Hamburger Menu in Xamarin iOS


The Hamburger Menu is a Navigation Bar button placed typically in a top  left corner of a graphical user interface. 
Once clicked, the menu gets extended from the left side and takes over two-thirds of the screen. Here, the users can choose whatever option they want to navigate to. 

This type of app navigation is more popular in Android apps. And because of its ease of navigation and to maintain consistency between the Android and iOS applications this has gained popularity in the iOS apps as well.
In this blog post, I’ll walk you through the steps on how to create slide out hamburger menu.

Getting Started 

 Step 1: Create a single view application in Visual Studio
Step 2: Open the Main.storyboard file in Xcode


 Step 3: Drag a stack layout into the view controller scene

Step 4: Add buttons to the stack view
Step 5: Place Stack view accordingly and add constraints to stack view
  •  Add left and top margin to be zero to stack view.
<span">
  • Add stack view width equals to super view width constraint by control- dragging stack view to view and selecting equal widths. 


  • Change the equal widths constraint multiplier to 0.55


Step 6: Change the button titles.
Step 7: Add a view over the view controller and change its background colour.
See to it, that its placed below the stack view in the hierarchy, so that it covers the stack view.
Step 8: Add Top,Bottom,Left and Right margin constraint to the view  to be zero 

Step 9: Add references to the leading and trailing constraints

Step 10: Embed the view controller in a navigation controller and make the navigation bar opaque.
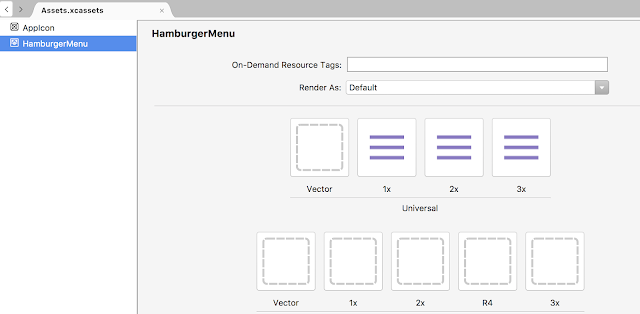
Step 11: Add hamburger menu button icon in assets file
Step 12: Add a bar button item to the navigation bar and change its image to a hamburger menu image

Step 13 : Add a referencing outlet for the bar button 
Step 14 : Add a bool to know if the menu is visible or hidden in the ViewController.cs file
  bool _hamburgerMenuIsVisible = false;
Step 15: Add the menu button action.
      public override void ViewDidLoad()                                     
      {                                                                
            base.ViewDidLoad();                                          

           //Add Button Action                                       

           MenuButton.Clicked += MenuClickedAction;                  

        }                                                                


    private void MenuClickedAction(object sender, EventArgs e)         

   {                                                                   
           if (!_hamburgerMenuIsVisible)                                    
           {                                                                   

                //Unhide the menu                                           

                leadingConstraint.Constant = 150;                           

                trailingConstraint.Constant = -(150);                     

                _hamburgerMenuIsVisible = true;                             
            }                                                                     

            else                   
            {                                                            
                //Hide the menu                                        

                leadingConstraint.Constant = 0;                        

                trailingConstraint.Constant = 0;                     

                _hamburgerMenuIsVisible = false;                       

            }                                                          
            //Animate the hiding and unhiding                       

            UIView.Animate(0.3, 0,  UIViewAnimationOptions.CurveEaseIn, AnimationAction, AnimationCompletionHandler);                                          
  }                                                                       


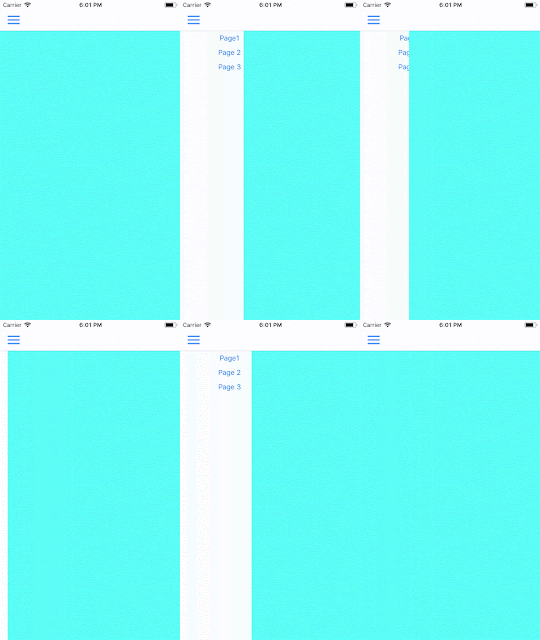
Change the leading and trailing constraints  of the cyan color view to show and hide the stack view underneath.
Add view animation to give it a animated effect.

              private void AnimationAction()                   
        {                                                               
           this.View.LayoutIfNeeded();                                
        }                                                                 


        private void AnimationCompletionHandler()                   
        {                                                                
           //Completion of Animation                   
        }              
                                            
Now on click of menu button the navigation drawer can slide out and in with animation as 
Step 16: Add navigation from the menu to other screens
  • Add three view controllers in the storyboard and change their background colours
  • Control-drag from button to the view controller and select push segue to navigate with push animation to that view controller on click of the button


    Here is how its going to look after adding the navigation

    I hope you enjoyed this blog. Feel free to download the completed project file.

Popular Posts