The Hamburger Menu is a Navigation Bar button placed typically in a top left corner of a graphical user interface.
Once clicked, the menu gets extended from the left side and takes over two-thirds of the screen. Here, the users can choose whatever option they want to navigate to.
This type of app navigation is more popular in Android apps. And because of its ease of navigation and to maintain consistency between the Android and iOS applications this has gained popularity in the iOS apps as well.
In this blog post, I’ll walk you through the steps on how to create slide out hamburger menu.
Getting Started
Step 1: Create a single view application in Visual Studio
Step 2: Open the Main.storyboard file in Xcode
Step 3: Drag a stack layout into the view controller scene
Step 4: Add buttons to the stack view
Step 5: Place Stack view accordingly and add constraints to stack view
- Add left and top margin to be zero to stack view.
<span">
- Add stack view width equals to super view width constraint by control- dragging stack view to view and selecting equal widths.
- Change the equal widths constraint multiplier to 0.55
Step 6: Change the button titles.
Step 7: Add a view over the view controller and change its background colour.
See to it, that its placed below the stack view in the hierarchy, so that it covers the stack view.
Step 9: Add references to the leading and trailing constraints
Step 10: Embed the view controller in a navigation controller and make the navigation bar opaque.
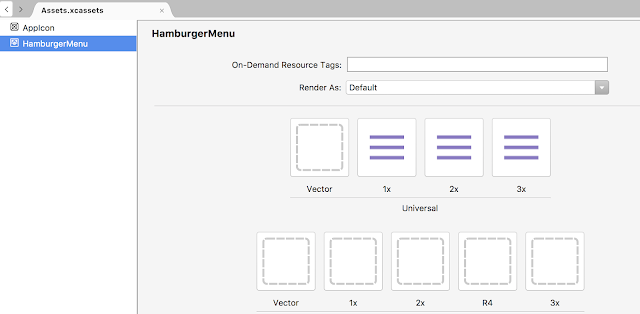
Step 11: Add hamburger menu button icon in assets file
Step 12: Add a bar button item to the navigation bar and change its image to a hamburger menu image
Step 13 : Add a referencing outlet for the bar button
Step 14 : Add a bool to know if the menu is visible or hidden in the ViewController.cs file
bool _hamburgerMenuIsVisible = false;
Step 15: Add the menu button action.
      public override void ViewDidLoad()
      {
            base.ViewDidLoad();

           //Add Button Action

           MenuButton.Clicked += MenuClickedAction;

        }


    private void MenuClickedAction(object sender, EventArgs e)

   {
           if (!_hamburgerMenuIsVisible)
           {

                //Unhide the menu

                leadingConstraint.Constant = 150;

                trailingConstraint.Constant = -(150);

                _hamburgerMenuIsVisible = true;
            }

            else
            {
                //Hide the menu

                leadingConstraint.Constant = 0;

                trailingConstraint.Constant = 0;

                _hamburgerMenuIsVisible = false;

            }
            //Animate the hiding and unhiding

            UIView.Animate(0.3, 0,  UIViewAnimationOptions.CurveEaseIn, AnimationAction, AnimationCompletionHandler);
  }
Change the leading and trailing constraints of the cyan color view to show and hide the stack view underneath.
Add view animation to give it a animated effect.
private void AnimationAction()
        {
           this.View.LayoutIfNeeded();
        }


        private void AnimationCompletionHandler()
        {
           //Completion of Animation
        }
Now on click of menu button the navigation drawer can slide out and in with animation as
Step 16: Add navigation from the menu to other screens
- Add three view controllers in the storyboard and change their background colours
- Control-drag from button to the view controller and select push segue to navigate with push animation to that view controller on click of the button
Here is how its going to look after adding the navigationI hope you enjoyed this blog. Feel free to download the completed project file.


