A simple spinner view or a drop down view is quite a common UI component in android. In most cases to have consistent UI across all platforms, it is necessary to replicate this component in iOS as well.iOS does not have a drop down view UI component in-built, instead it supports a picker view.
A drop down control conserves screen space and enables a user to choose one of the options provided, and thus prevents a user from entering erroneous data since they only show legal choices.
Today we will be looking into creating custom controls to mimic the behaviour of drop down control in Xamarin iOS.
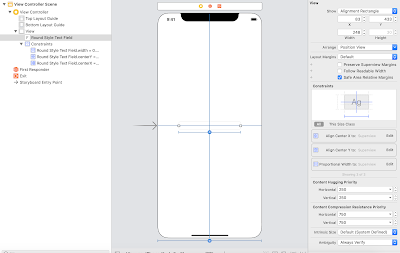
Step 1 : Add a text in story board and add appropriate constraints to it. Here I have added centre horizontal , centre vertical and width equals 60 % of the superview.
Step 2 : Take an outlet of the textfield

Step 3 : The drop down control is going to be a table view, which is going to be shown and hidden on tap of the text field.
Make the view controller inherit the table view delegate and table view data source and text field delegate interfaces.
A drop down control conserves screen space and enables a user to choose one of the options provided, and thus prevents a user from entering erroneous data since they only show legal choices.
Today we will be looking into creating custom controls to mimic the behaviour of drop down control in Xamarin iOS.
Step 1 : Add a text in story board and add appropriate constraints to it. Here I have added centre horizontal , centre vertical and width equals 60 % of the superview.

Step 2 : Take an outlet of the textfield

Step 3 : The drop down control is going to be a table view, which is going to be shown and hidden on tap of the text field.
Make the view controller inherit the table view delegate and table view data source and text field delegate interfaces.
 public partial class ViewController : UIViewController ,IUITableViewDataSource,
        IUITableViewDelegate, IUITextFieldDelegate
Step 4 : Create a array of options string that you want to display in the drop down.
 private readonly string[] _optionsList = new string[]
       {
            "Option 1", "Option 2", "Option 3",
            "Option 4", "Option 5"
       };
Step 5 : Implement the data source method to get the number of rows in section.
        [Export("tableView:numberOfRowsInSection:")]
        public nint RowsInSection(UITableView tableView, nint section)
        {
            return _optionsList.Length;
        }
Step 6 : Implement the data source method to get the cell at the index path.
       [Export("tableView:cellForRowAtIndexPath:")]
        public UITableViewCell GetCell(UITableView tableView, NSIndexPath indexPath)
        {
            UITableViewCell cell = tableView.DequeueReusableCell("DropDownCell");
            cell.TextLabel.Text = _optionsList[indexPath.Row];
            return cell;
        }
Step 7 : Implement the data source method to get the view for table view footer.
        [Export("tableView:viewForFooterInSection:")]
        public UIView GetViewForFooter(UITableView tableView, nint section)
        {
            UIView footerView = new UIView(new CGRect(0, 0, 0, 0));
            return footerView;
        }
Step 8 : Implement the data source method to get the height for footer.
        [Export("tableView:heightForFooterInSection:")]
        public nfloat GetHeightForFooter(UITableView tableView, nint section)
        {
            return 1;
        }
Step 9 : Declare 2 variables, one drop down Table View and other a UIView to hold the Table view.
        /// <summary>
        ///     The drop down table view.
        /// </summary>
        private UITableView _dropDownTableView;

        /// <summary>
        ///     The drop down view.
        /// </summary>
private UIView _dropDownView; private void CreateDropDownView(CGRect frameForDropDown)
{
_dropDownView = new UIView(frameForDropDown);
_dropDownTableView = new UITableView(new CGRect(0, 0, frameForDropDown.Width, frameForDropDown.Height));
_dropDownTableView.RegisterClassForCellReuse(typeof(UITableViewCell), "DropDownCell");
_dropDownTableView.DataSource = this;
_dropDownTableView.Delegate = this;_dropTextField.Delegate =this; _dropDownView.AddSubview(_dropDownTableView);
            AddShadowToDropDown();
}
Step 11 : Create a method to add shadow effect to the drop down view.
        private void AddShadowToDropDown()
        {
            var shadowPath = UIBezierPath.FromRect(_dropDownView.Bounds);
            _dropDownView.Layer.MasksToBounds = false;
            _dropDownView.Layer.ShadowColor = UIColor.Black.CGColor;
            _dropDownView.Layer.ShadowOffset = new CGSize(width: 0, height: 0.5);
            _dropDownView.Layer.ShadowOpacity = 0.2f;
            _dropDownView.Layer.ShadowPath = shadowPath.CGPath;
            _dropDownTableView.ClipsToBounds = true;
        }
Step 12 : Call the above methods in view did load.
        /// <summary>
        ///     View did layout subviews.
        /// </summary>
        public override void ViewDidLoad()
        {
            base.ViewDidLoad();
            CreateDropDownView(new CGRect(countryTextField.Frame.X,countryTextField.Frame.Y,
                countryTextField.Frame.Width,43 * _countryList.Length));
        }
Step 13 : Show the drop down view when text field editing starts. Override ShouldBeginEditing method and return false to disable the keyboard from appearing.
        [Export("textFieldShouldBeginEditing:")]
        public bool ShouldBeginEditing(UITextField textField)
        {
            View.AddSubview(_dropDownView);
            UIApplication.SharedApplication.KeyWindow.BringSubviewToFront(_dropDownTableView);
            return false;
        }
Step 14 : On Row selection fill the text field with the data selected and dismiss the drop down view.
       [Export("tableView:didSelectRowAtIndexPath:")]
        public void RowSelected(UITableView tableView, NSIndexPath indexPath)
        {
            dropTextField.Text = _optionsList[indexPath.Row];
            _dropDownView.RemoveFromSuperview();
        }
This is how it is going to look at the end.

